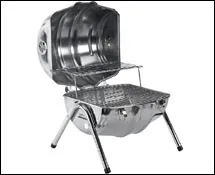
We first wrote up a keg BBQ build on this site in 2008, back when the entire project was essentially “drink a keg, cut it in half, hang it from a hook, light charcoal.” It was a terrible how-to by modern standards. The idea still works. The build is still worth doing. The physics are the same. What changed is that we have cut several more since then, we have watched friends do it badly, and we have learned exactly which steps get skipped and then regretted. This is the version of the guide we wish we had written the first time.
A keg BBQ is not a smoker, not a kamado, not a pizza oven. It is a cylindrical charcoal grill with a hinged lid, built from stainless steel that is already dialed to about the right thickness for backyard cooking. Done right, it holds heat better than a $90 Weber kettle and costs about the same. Done wrong, it is a dangerous bucket.
Is It Legal to Make a Grill Out of a Beer Keg?
Short answer: only if you own the keg outright. Long answer, the one that saves you a theft charge: the deposit you leave at the liquor store is not a purchase. The keg still belongs to the brewery, and every one of them is stamped somewhere with their property mark. Breweries pay $150 or more per sanke keg and they want them back. According to Brewers Association reporting and multiple regional news investigations, keg theft for scrap is a running problem the industry tracks closely.
Where to get a keg you actually own:
- Brewery scrap sales. Most regional breweries list retired or damaged kegs for sale once or twice a year, usually $40 to $90 depending on condition.
- Restaurant and bar auctions. When a bar closes, its deposit kegs get listed with the fixtures.
- Licensed scrap metal dealers. A dealer that paid the brewery for scrap value can resell the keg to you legally. Ask to see the paperwork.
- Homebrew shops. Some sell dented kegs they have pulled from the deposit cycle with the brewery’s blessing.
Craigslist and marketplace listings for “cheap empty kegs, no questions” are almost always stolen. If the seller cannot show you where the keg came from, walk away. This is not a lecture, this is the one step that keeps the project a weekend build instead of a court date.
What Keg Should I Use?
The build works on anything bigger than a corny keg, but one size is the sweet spot. Here is how the common keg sizes compare for grill duty.
| Keg size | Capacity | Height | Diameter | Grill surface per half | Verdict for a grill |
|---|---|---|---|---|---|
| Half-barrel (full-size sanke) | 15.5 gal | 23.3 in | 16.1 in | about 265 sq in | The right size. Comparable to a 22 in Weber kettle. |
| Quarter-barrel (pony) | 7.75 gal | 13.9 in | 16.1 in | about 160 sq in | Too shallow for a two-zone fire, lid barely clears a chicken. |
| Sixth-barrel (torpedo) | 5.16 gal | 23.3 in | 9.25 in | about 110 sq in | Fun side-table build, but not a main grill. |
| Mini keg (5 L) | 1.32 gal | 10 in | 6.9 in | too small to count | Decoration only. |
| Corny keg (homebrew) | 5 gal | 23 in | 8.5 in | about 100 sq in | Stainless but thin-walled. Skip. |
A standard US half-barrel is the one. The diameter is nearly identical to a Weber Original Kettle, which means a 22 inch replacement grate drops in with no modification. Twenty-three inches of length gives you room for a two-zone fire, direct heat under half the grate and a cool side under the other half. Everything in this guide assumes you are cutting a half-barrel.
What Tools Do I Need?
- 4-1/2 inch angle grinder. Any brand that pulls at least 7 amps will finish the cut without stalling. Our shop grinder has survived three keg builds and roughly a dozen other projects.
- Metal cut-off wheels, 1 mm thickness. Buy a 10-pack. You will use three to five on a single keg.
- Flap disc for the same grinder. 60 grit or 80 grit, for dressing the cut edge.
- Variable-speed drill with a step bit. The step bit handles the hinge mounting holes and the vent holes without walking across the stainless.
- 1/4 inch metal drill bit for the carriage bolt holes.
- Welding gloves rated to 500 F or higher. Stainless shavings go through nitrile gloves and bite.
- Face shield and hearing protection. This project generates enough sparks and noise to earn both. We learned the face shield lesson the loud way in 2009.
- C-clamps or welding magnets to hold the halves aligned while you drill the hinge holes.
- Fire extinguisher. Standing by, not in the shed. A hot cut-off wheel landing on dry grass starts a fire in under 15 seconds.
How Do I Cut the Keg?
Mark your cut line first, before anything touches the keg. Lay the keg on its side on a workbench, chock it with scrap wood so it will not roll, and run a strip of blue painter’s tape all the way around the long axis. The tape gives you a straight edge to scribe against. Keep the line a few inches off center so the finished lid has gravity on its side and will not try to flop open on its own.
Score the full line first, 1/16 inch deep, all the way around. Do not try to go straight through on one pass. The thin kerf you get from a 1 mm wheel makes a flush closing seam, and a shallow score keeps the two halves locked together while you deepen the cut.
Deepen the kerf in two more laps around the keg. On the last lap, change angles so you can see when the wheel breaks through. Keep sparks aimed away from your body, and expect to burn through at least three cut-off wheels. If the grinder stalls, back off the pressure and let the wheel do the work.
When the two halves finally separate, swap in the flap disc and dress every inch of the cut edge. Cut stainless is sharper than any knife in your kitchen and bites fast through gloves. Dress until the edge is smooth enough that a bare finger can run along it without finding a burr. This step takes 20 minutes and prevents the one injury that puts people off the project forever.
How Do I Hinge It?
Clamp the two halves back together in their closed position, cut edges mating. Mark two hinge locations on what is going to be the back seam, 6 inches in from each end. Three-inch heavy-duty hinges in stainless or zinc-plated steel are the right size. Smaller hinges rip out, bigger hinges look like you built a garden shed.
Drill the hinge holes through both halves at once with the step bit so the holes align perfectly. Bolt the hinges with 1/4 inch stainless carriage bolts, washer under the head on the outside, lock nut on the inside. Snug but not torqued down, you want the lid to swing without binding.
A properly hung lid opens to about 110 degrees and sits there without a prop. If it wants to flop backward past vertical, the hinge mounting is too far up the back of the keg. Shift the holes two inches toward the seam and try again.
Add the handle on the front of the lid, 12 inches above the seam, using the same carriage bolt pattern. A wood-faced BBQ handle is ideal because stainless gets painfully hot. If you cannot find a dedicated grill handle, a 6 inch length of oak drilled for two bolts does the same job and looks better.
How Do I Build the Stand?
A half-keg sitting on the ground is a knee-high grill. You want cooking height, roughly 32 to 36 inches to the grate. That means the stand needs to be about 28 to 30 inches tall after the keg drops into its cradle.
Two paths:
- Welded angle iron frame. The best-looking version. 1-1/4 inch angle iron, cut four 30 inch legs and a square top rail, with two 10 inch cradle arms sized to the keg’s balance point. Weld, prime, paint. Takes an afternoon if you have the gear.
- Bolted sawhorse frame. 2x4 pressure-treated lumber, two X-leg sawhorses connected by a crossbrace, with the keg strapped on top with two ratchet straps. Looks less finished but is weatherproof, stable, and buildable with hand tools.
A third option that works surprisingly well: find a used weight bench. The flat center section is almost exactly the right height, and the triangular leg geometry handles the weight. We have seen two keg grills built this way at different friends’ houses and both are still in service.
How Do I Fit the Cooking Grate?
A 22 inch Weber Original Kettle replacement grate is the shortcut here. The internal diameter of a half-barrel keg is close enough to 22 inches that a Weber grate drops in and catches on the keg wall about 2 inches below the cut edge, which is exactly where you want it. No cutting, no bending.
If the grate sits lower than you want, drill three holes evenly spaced around the keg wall and bend three stainless hooks from heavy wire or steel strap to hang the grate at the ideal height. Three hooks are more stable than four, counterintuitive but true.
For charcoal, a layer of charcoal underneath on the keg floor works for most cooks, but a proper fire grate 2 inches off the floor doubles the burn efficiency. A 10 inch round hibachi grate or a cut-down expanded metal mesh gives you that elevation. Prop it up on four stainless carriage bolts drilled into the floor and threaded point-up with lock nuts.
How Do I Season It Before the First Cook?
Paint the outside with two coats of high-heat BBQ paint, flat black. 20 minutes between coats. Let it cure overnight. BBQ paint needs heat to fully set, so expect some smoke on the first burn-in.
Build a full chimney of hardwood lump charcoal, pour it in, close the lid, and let the grill run empty at full heat for one hour. This burns off any cutting oil, residual beer sugars, dish soap, paint fumes, and factory crud from the Weber grate. After the hour, let it cool completely, wipe the inside with a wad of oiled paper towel, and it is ready to cook on.
The first real cook should be something forgiving. Chicken thighs. A rack of pork spare ribs. Anything with a long rendering time and a forgiving crust. Save the briskets for round three.
Is a Keg BBQ Better Than Just Buying a Weber?
Honestly, no. A new 22 inch Weber kettle will outperform a keg grill on consistency, cost once you add up the parts, and the time you spent cutting. A keg grill wins on exactly one thing, which is that it looks awesome and nobody else at the cookout has one. If that trade sounds fair to you, build it. If not, buy the kettle. We have cooked on both for years and both make better food than the gas grill they sit next to.
If the DIY itch is bigger than the grill itch, this project pairs well with a horseshoe pit for the yard, DIY washer toss boxes, and a ladder golf set from PVC. Make a day of it. Build everything in one weekend and spend the rest of the summer using it.
Responsible Drinking Note
A build day with power tools is a build day, not a bar. Keep the beer in the fridge until the grinder is unplugged and the keg halves are safely edged. If the project runs into the afternoon and friends want a drink, swap to water during cuts and welds and save the drinks for the burn-in test cook. All content on this site assumes readers of legal drinking age. Build sober, drink later, keep both hands.
Quick Answers
Is it legal to cut up a beer keg? Not if the keg still belongs to the brewery, which most do. Buy a decommissioned keg from a brewery scrap sale, a restaurant auction, or a licensed scrap dealer. Craigslist listings for “cheap empty kegs” are usually stolen.
How much does it cost to build a keg grill? About $120 to $180 all in. Decommissioned half-barrel $40 to $90, hinges and hardware about $25, 22 inch replacement grate around $35, legs or a stand $20 to $40.
How long does the build take? About a full Saturday. Four hours of cutting and grinding, two hours of drilling and bolt-up, one hour for paint. Overnight for paint cure, then burn in.
What size keg makes the best grill? A US half-barrel, 15.5 gallon sanke. Roughly 265 square inches of cooking surface per side, nearly identical to a 22 inch Weber kettle.
Do I have to weld? No. Every step can be done with bolts and hinges. Welding gives a tighter seal and cleaner stand, but a bolted build lasts.
Is the inside of a beer keg food safe? Yes once it is cleaned and burned in. Stainless 304 is the standard sanke alloy and is food safe. Flush with hot water and soap, dry fully, burn in at full heat for one hour before cooking.
The Short Version
Buy a legally decommissioned half-barrel keg. Cut it in half the long way with an angle grinder, slow passes with a 1 mm cut-off wheel. Dress the edges with a flap disc until they do not bite. Bolt on two 3 inch hinges on the back seam. Add a wood-faced handle on the front. Drill vent holes top and bottom at opposite ends. Drop in a 22 inch Weber replacement grate. Build a stand that puts the grate 32 to 36 inches off the ground. Paint, burn in, cook. One Saturday, about $150, and a grill nobody else at the cookout owns.